Outside activities for kids that promote drawing, reading, writing, and math, help children find meaningful ways of practising the skills they have previously learned. Keep activities fun and relaxed and not too structured.
1. Make “I Wonder Why…” books
- Whether you live in a rural area or in the city, taking an “I wonder why…” walk with your students will get them asking questions
- Gather a clipboard, paper, and a pencil and ask the kids to come up with as many “I wonder…” questions as they can think of as you wander outside. Jot down their names and their questions.

If you have a lot of students, this activity is easier if you bring bugs or other live creatures into the classroom and put them in a large glass jar or aquarium. Then record the children’s, “I wonder why” statements throughout the day.
Children might come up with questions like…
- I wonder why the pill bugs live under the log…
- I wonder why this leaf is curled and stuck together…
- I wonder why the plants can grow in the cracks of the sidewalk…
- I wonder why the little birds are chasing that crow…
Children investigate one question at a time by exploring on the spot. Some questions lead to looking for, and reading books on the subject.
Making a booklet (see image above)
To use the above I Wonder Why image for a book cover, download the free copy here or have students design their own. Children insert as many blank pages as they need, then staple their book together.
2. Make a “5 Things I Notice About …” book
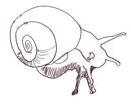
After an exploratory trip outside, bring a slow-moving animal such as a slug, a snail or caterpillars inside for a short visit.
While outside, have kids notice…
- The habitat of the animal. Is it dry? wet? Are there sticks? rocks?
- Gather a few items from around the area where you found the creature.
- Place the items in a big glass restaurant jar or aquarium.
- Add a few drops of water.
- Only keep the animal for an hour or two in a shady area and then let it go.
Materials:
- Mini-books – Cut 2 piece of photocopy paper in half and then stack and fold all the pieces and staple to make a mini-book. This will make enough pages to write on one side only as felt markers may bleed through the pages.
- One felt markers per child for drawing
- Crayons for coloring in their drawings (coloring with felt markers often makes the drawings unrecognizable!)
- Magnifying glasses
Procedure:
- Children observe the creature collected
- Encourage the students to notice 5 different things about the creature.
E.G. “5 things I notice about the snail” - Make a booklet yourself and encourage children to draw pictures, make labels and arrows on their diagrams and to print short sentences about the animal.
- Keep a library of the children’s mini-books and read them together. Compare observations.
- Express the importance of returning the creature back to its natural environment and placing it carefully out of harm’s way.
- Teach the four Ls of learning from living creatures: Look at them, learn about them, let them go (after an hour or two), then leave them alone.
- Role play how it would feel to be stuck in a jar in the hot sun and the importance of only studying a living creature for a short time
3. Investigate collections
Using short periods of time examining and investigating objects captures children’s attention and challenges them to inquire and to develop problem-solving skills. It also provides many opportunities to increase students’ vocabularies.
If you’re interested in learning more about how to do this, it’s covered in a step by step way in my ebook, Challenging Children to Investigate with Everyday Things.
4. More ideas to help children make collections & investigate
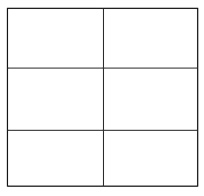
Collections are great and may later be used for further investigations and comparisons. The simple grid below keeps children from gathering too many objects. Ask children to come up with ideas of items to collect. Help them to narrow their focus if necessary.
See an example lesson using collections to inspire kids to investigate here…
Materials:
A note about clipboards:
Gather clipboards at the beginning of the year. Having one for each child makes it easier to complete outdoor observations throughout the year. Securely tape a black felt marker to each clipboard with packing tape. I remove the lids from the markers when I pass out the clipboards because some always get lost outside! When each child comes back inside they put the lid on their marker.
- Cardboard or paper the size of the clipboards for each child or pair of children
- A clipboard for each child or pair of children with dark felt marker and string taped on to it (Crayola sells sets of black markers)
- Double sided tape
 Preparation:
- Make a grid like the one in the image with a permanent marker on the cardboard or paper. Don’t worry about it being perfect, the kids don’t care.
- Children can make their own grids if you like.
- Make fewer grid sections for younger children who print larger and more sections for those skilled at printing smaller
- Put a piece of double-sided tape in each square.
- Have fun!
Children:
- Attach a grid to a clipboard and go outside.
- For different excursions suggest that children look for different items to collect.
- Suggestions –
- Things that are round
- Things that are brown
- Things that fall from trees
- Things that are light
- Seed pods in the garden
- Petals
- Children gather items and then stick them on their grid
- They investigate their items and try to print the name of each item underneath.
Extend the activity
When the children are inside,
- they can cut along the grid lines
- sort their own objects
- compare what they gathered to what their friends found
- compare and contrast items, measure items
Here’s the link again to the free “I wonder why” book cover if you missed it.


