Step-by-step drawing continued – completing the pictures
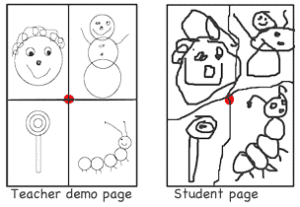
After completing the first page of step-by-step drawing, which teaches children how to make the basic circle shape and how to divide their page, then go on to the next step, teaching them to draw a picture in each box using the shape they just learned to make.
Demonstrate one step of each picture at a time, and check often to see that all children are successful. Arrange the students so that you can see each child’s paper from where you stand and demonstrate, so you can quickly help a child who needs help. As you demonstrate each step on large paper or chalkboard, say something like this:
“In your first box, draw a circle about this big – this is a nose. Put 2 little circles above it – these are eyes. Let’s make a happy smile.
Put your felt here, go down, go up. Put a big circle all around it for a head. Finish with some round and round hair…You’ve made a boy or girl…”

Finish the page the same way
In the next box…
“Make a big circle near the bottom of your box. Make a smaller circle on top of it. Make a smaller circle on top of that circle..show each step. Draw two circles for eyes, a line for a carrot nose (triangles come later) on the top circle. You’ve made a snowman.”
“Make a small circle in the middle of the next box. Make a bigger circle around it… Make an even bigger circle around that one.” Show only one step at a time and check that all kids are successful. Put a long stick under it. You’ve made a lollipop.
In the last box…
“Make a row of circles making sure that they all touch. Draw two circles for eyes on the first one (great time to teach ordinal numbers, first, second, third…). Make lots of little tiny circles under the caterpillar for feet. Now you’ve made a caterpillar.”
Later on in the year, the students sound words out as a group and print them in the boxes near drawing.
Step 4: Finish the picture
- To begin with, when drawing with kids, I let those who want to color their step-by-step drawings with crayons while the rest of the children choose a center.
- Later in the year, I ask them all to add crayon color to their pictures.
- After years of experimenting with crayons, I think Prang crayons are the best for primary art. They are soy based, have bright colors and do not flake all over the children’s drawings and the tables.
 Drawing Teacher Tips
- If the children are having a difficult time with step-by-step drawing, you may be going too fast, making assumptions that they are understanding your vocabulary (right, left, under, over, beside, next to, in front of, larger, largest…) or expecting them to follow too many steps at a time.
- Use the largest paper possible.
- Teach the students how to draw big. Demonstrate drawing a teeny picture in the middle of your paper and show them how hard it is for viewers to see it.
- Children are inspired by their teacher’s enthusiasm.
- To challenge children who already draw with confidence, give them an extra paper and let them draw whatever they want between the steps.
Next, squares, rectangles, triangles and zigzags…

