Step-by-step drawing #3 – squares, rectangles, triangles and zigzags
The next time you teach a step-by-step kindergarten drawing lesson, repeat the four steps from the previous post, but teach the children how to draw a different shape.
Once the students have had some practice making pictures using the circle shape, show them how to make a square, a rectangle, a triangle and a zigzag.
Teach all the shapes over a period of a month or two.
You’ll see the children’s confidence level rise as they feel equipped to draw houses, cars, mountains and more.
Kindergarten drawing: step-by-step squares and rectangles
- Draw a line, like this, (draw a horizontal line)
- Drag your finger (kids will use their felt markers if you don’t specify) up from one end of the line…
- Make a dot…
- Drag your finger up from the other end of the line and make another dot.
- Join the dots to the sides of the line, like this and you have a rectangle shape.
- Show them the difference between a square and a rectangle
- Things to draw with squares and rectangles: presents, books, buildings, ABC blocks, trains (add wheels), chocolate bars…
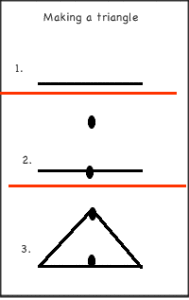
Kindergarten drawing: step-by-step triangles
- Draw a line across the bottom of your paper like this.
- Put a dot in the middle of the line.
- Drag your finger up (not your felt) and make a dot.
- Join the dot to the ends of the line.
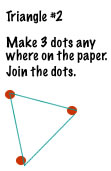
Some kids find this method of making a triangle easier:
- Make 3 dots anywhere on your paper.
- Join the dots with 3 straight lines (straight lines are not that easy when you’re 4 or 5).
- Things to draw with triangles: ice cream cones, clown hats, cat noses, mountains, sails on boats, trees, roofs on houses, jack o lantern eyes…
Kindergarten drawing: step-by-step zigzags
- Give the children a long strip of paper (tape to table horizontally if necessary).
- Start at the bottom of the paper.
- Say go up, go down, go up, go down…. until the long strip is finished.
- Then give the children a big paper with a horizontal line through the center.
- Draw a zigzag in the top section.
- Draw another in the bottom section.
Another day teach drawing zigzags back and forth.
- Put a long strip of paper vertically on the table.
- Say go “out, in, out, in…”
- When the children can make a zigzag they can draw cat ears, a row of trees, mountains, waves, scales on a fish, or patterns on a snake.
It’s also useful to teach the children “the happy smile” line and “the rainbow line”. For instance when you are instructing them to draw a fish, say, “Make a rainbow line on the top and a happy smile line on the bottom, which forms a fish body.
Drawing Books
After the first bunch of drawing lessons, I give each child a large coiled drawing book. At first, they love to drag their felt markers along the coils and listen to the noise, so I always start with a minute or two of coil music! This gets it out of their system.
The children make a theme based step-by-step drawing on each page, usually once a week using the basic shapes taught above. The felt outline and crayon coloring make bright, cheerful drawings that the children are proud of. They add words to their pictures with kid writing.


