Start a unit on kindergarten maps by reading “Rosie’s Walk” by Pat Hutchins.
It’s an excellent story to begin map activities. Like all early childhood concepts, keep mapping as hands on as possible for preschool and kindergarten students.
Read Rosie’s Walk to the children a few times before using the book as a basis for activities. Don’t assume that young children know that the fox is after Rosie, why the fox is chasing Rosie or that foxes eat chickens.
Introduce the book by talking about the cover picture. Inside there is a picture of the whole barnyard that’s great for photocopying and enlarging to review all the places that Rosie went during her walk.Introduce vocabulary such as journey, story map, trip, destination, travel as they talk about the story. See below for mapping ideas.

A note on length of activities when working with young children
 I found that keeping activities less than 20 minutes long worked best with a large group of young children. The ones with longer attention spans for the activity will keep on working, while the others engage in other activities. Breaking activities into smaller sessions over the week avoids many discipline type issues.
Making Story Maps
Session 1 – After reading the story, focus the children’s attention on the illustration of the whole barnyard inside the book. Trace Rosie’s walk with a cut out, photocopied image of Rosie (glue to a popsicle stick). Tell them it is a map of Rosie’s walk or journey.
Ask the children what they know about maps. This usually leads to a discussion of treasure maps and pirate stories! Discover what they know about maps, about what is a map, what experiences have they had with maps, and how do maps help us.
Ask them what they would like to know about maps. Record their questions.
Session 2 – Students create their own story map.
- Optional: Create an interactive bulletin board map for Rosie’s Walk for the children to play with. See the instructions on this post for making it.
- Teacher Makes a Story Map
- Creates a different story character on a popsicle stick and show the kids
- Using a large piece of paper, asks the children to describe some places for the story character to travel around on its journey.
- Draws the map as the children suggest places.
- When finished describe the whole trip, moving the character around the story map.
Session 3 – After reviewing the map from session 2 above (don’t spend a lot of time) the children make their own maps.
- Provide children with the following to draw and cut out their own character.:
- a 3′ square of card
- a popsicle stick
- tape, scissors, a marker to draw with, crayons to color in (see method here…)
- a larger piece of paper to draw their own “map” for their character’s journey.
- First, they choose and make their character
- Second, they create a “map” for the character to travel through.
Session 4 –
- The children share their story maps with a partner.
The concept of viewpoint

Introduce the concept of viewpoint to students as you read stories to the children. “In this story the artist is showing us what the garden looks like to the bird flying overhead”.
These discussions will help children have a better understanding of the concept of viewpoint as it relates to maps.
- Make a simple blank booklet for each child
- Model the activity
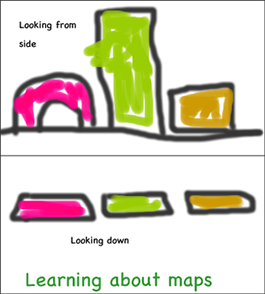
- Use no more than 4 different shaped blocks to make a village
- “How does your village look when your face is down by the floor?”
- Record in your booklet
- “How does your village look when you stand above it and look down?”
- Record in your booklet
- Discuss how most maps are made from the last viewpoint
- Vocabulary – introduce the terms, view, viewpoint, bird’s eye view, cut away view, side view
The concept of how to make maps – drawing a one meter map
The following activity helps to expand children’s concepts of mapping. As always, model the following activity first
Materials:
- Older buddies!
- meter or yardstick for each 2 or 3 groups (borrow from other classrooms, if necessary)
- 4 popsicle sticks per buddy and child
- 1.5 meters or yards of string per buddy and child
- 8.5″ x 8.5″ of paper or similar square size
- clipboards with pencil attached
Procedure:
- Teacher models the activity with a large piece of chart paper
- Talk about how the children are going to make a smaller picture of their square of grass
- With an older buddy have the child mark off a one square meter or yard of ground with four popsicle sticks and string
- Give the children clipboards, pencils, a square piece of paper
- Children observe, then draw what is inside their square
- To extend the activity, give the children more sticks and string to mark off their square meter into four equal sections
- Have them repeat the activity with a new piece of square paper, drawing the new string lines as well, and compare the results
- Introduce the word grid and how grids help us to position things more accurately
 Don’t assume that children understand that a map is a much smaller representation of the real thing. The kids with little travelling experience may have a more difficult time understanding distance than those with experience.
Sequence the story activity
- Photocopy the pages from Rosie’s Walk
- Use magnets to attach the pages to a magnetic white board or use sticky tack
- As a group, have the students sequence the order of the story
- Leave the pages on the white board for children to sequence at center time
Linking to a new story, “Wolf Island”
- Talk about how the fox is a relative of the wolf
- Read more… – Wolf Island mapping activities