Teach hands-on pumpkin math and science lessons. Pumpkins are tough enough to withstand lots of hands-on activities.
Purchase a large pumpkin and a few smaller ones in various sizes to provide your students with science and math experiences.
Put the pumpkins in the science center for a few days before using them for teaching to give the children plenty of time to touch them and ask questions.
When students are working at stations, they take turns holding the pumpkins to compare how heavy they are and to feel the texture of the pumpkin shells.
Include pumpkin stories, cooking pumpkin muffins and pumpkin Geometry Jacks in your kindergarten lesson plans to keep your students interested.
Pumpkin Lesson Plan 1 – Measuring the pumpkin’s height…
- Gather string and Unifix™ blocks.
- Have the children sit on the carpet and tell them that you are going to measure how tall the large pumpkin.
- Build a tower of Unifix™ blocks from the floor to the tip of the pumpkin’s stem.
- Count the blocks as a group.
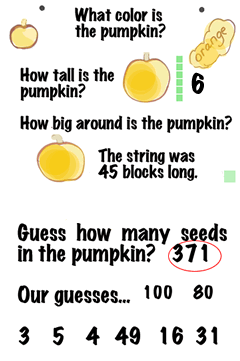
- Record the answer on a chart like the one below.
Pumpkin Lesson Plan 2 – Measuring the pumpkin’s circumference…
- Ask the students if they can think of a way to measure how many Unifix™ blocks it would take to go around the middle of the pumpkin (show them the middle). Introduce the word, “circumference”.
- After the children have had a chance to think and talk about it, wrap a string around the pumpkin, cut it when it meets and then measure how long the string is with the blocks.
- Have the group of children count the blocks and then record the answer on the chart.
- Save the bottom part of the chart to record the number of seeds in the pumpkin.
Follow up lesson – Pumpkin width graph
Materials:
Give each student…
- one 8 inch piece of orange paper
- brown rectangles about 1-inch x 2 inches (stems)
- Unifix™ blocks (one-inch blocks that hook together)
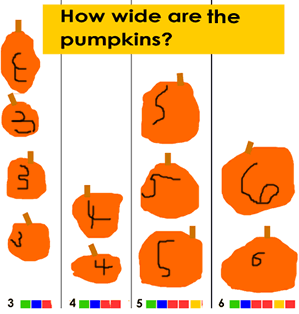
- make a graph on a piece of chart paper similar to the one below for students to tape their pumpkins on
Procedure:
- Students cut a pumpkin shape any size they want out of their piece of orange paper then glue the brown stem on their pumpkin.
- Students lay Unifix™ blocks across their pumpkins and count how many blocks wide their pumpkin is.
- Students print their number on their pumpkin
- Students tape their pumpkin above the correct number of blocks on the graph.
- As a group, count how many students made their pumpkin 3 blocks wide, how many made pumpkins 4 blocks wide, etc.
- Ask children. Did more children make pumpkins 3 blocks wide or did more children make pumpkins 6 blocks wide?
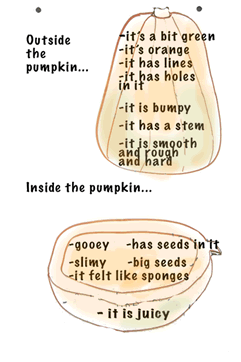
Observe the pumpkin inside and out
- Give children time to touch, smell, and look at the outside of the pumpkin.
- Record their words on a chart similar to the one on the left.
- Tell the students there are seeds in the pumpkin and have them estimate how many seeds are in the pumpkin.
- Print their guesses on the first chart.
- Cut the pumpkin in half and repeat the process.
- Record the children’s comments.
- During work stations time, students take turns picking the seeds out of the pumpkin and putting them on cookie sheets to dry.
- Provide a bowl for the pulp. Some children will not want to do this and others will love it.
Counting the Seeds
Materials:
- Dried pumpkin seeds
- small squares of paper
Procedure:
- Children guess how many seeds are in the pumpkin.
- Print their guesses on the bottom of the chart above.
- After the seeds have dried for a day or two, pile them on the tables and ask children to count groups of five seeds (or ten if your students are able) and place them on a square of paper.
- When all the seeds are counted out on squares, as a group count by 5s to 100 (or by 10s) and group those seeds.
- Count another group of 100 etc. until all the seeds are counted.
- Record the approximate number of seeds on the chart above.


