Help your students send their Mothers a message of love with simple Mother’s Day gifts and teach them to be thankful and appreciative for her.
Mothers (and Fathers but their day is in June!) are grateful for personalized cards made by their children, especially when they get thanks for all the monotonous chores they do day after day.
Start by having the children consider different times of the day and think of things that would be different if they did not have a mother (or aunt, or grandmother, foster mother… ) to help them. For example, ask, “What would breakfast time be like if … did not help me?”
Try the following easy activities, cards and presents for Mom.
Help children appreciate their Mothers
- Mother’s Day is a great opportunity for students to brainstorm the many things that their Mothers do for them.
- List their contributions in a pocket chart with printed frame sentences. Ann is thankful her mom…, Stephen is thankful that his mom…, etcetera.
- If you are using the frame sentences to glue into cards at a later time, keep them under 11″ to fit in the card. See the card activity below…
- If you prefer, complete the sentence by printing it all on the strip, for example, “Ann is thankful her mom gives her chocolate milk.”
- The image shows only the first part of the sentence on the strip and the children’s drawings finish the sentence.
Materials:
- Sentence strips preprinted with the frame sentence
- Be prepared with a few sentence strips for the children who don’t have mothers, “is thankful that his aunt or grandma…”.
- Paper for children’s drawings
- Markers for children’s drawings
Procedure:
- Read the strip together with the children
- Talk about things that mothers do for us
- Children turn to their partner or person on their right and tell each other one thing they are thankful for that their mothers do for them
- Pass out markers and felts
- Each child draws a picture to illustrate their sentence
- Teacher guides children to put their drawings in the pocket chart next to the sentence strip with their name on it.
- Children take turns reading their sentence strips to the class
- Students read the sentence strips for a few days, using the sentences to point out the letters and letter sounds that you may be teaching.
- Optional – At the end of the week, students use the strips for cards
Mother’s Day tea bag card
I am not sure where this Mother’s Day gift and card idea originated but it was a favorite one with my students.
Materials:
- Purchase enough tea bags (the type that is individually packaged with strings and tags) for the class.
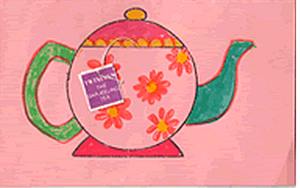
- Photocopy the basic teapot shape onto colored construction paper
- A real teapot to show the children how the handle is attached to one side and how the spout is attached to the other
Procedure:
- Pass the teapot around with the lid off (a lot of children have never actually handled a teapot!)
- Talk about what a spout is and a handle and the lid
- Children draw the handle and spout on to the basic teapot shape
- Students then decorate the card
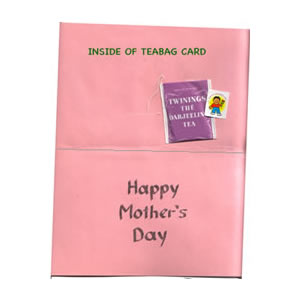
- Students copy the words Happy Mother’s Day if they are able and Love from… or ask a helper to do it for them
- A parent helper makes a small cut under the lid of the teapot and helps each child insert the tag and string through the slit. The tea bag sits inside the card (see image)
- Students choose a few Mother’s Day stickers to hold the tea bag in place
Mother’s Day Gifts – coffee filter pencil flower
- Purchase a pack of round coffee filters and a pretty pencil for each student
- Food coloring mixed with water
- Shallow bowls
- Clothes pegs
- Tape
- 6″ squares of wax paper pieces
- Name tags
Procedure:
- Each child tapes a name tag onto a piece of wax paper
- Set out three bowls of food coloring mixed with water
- Give each child 2 coffee filters stuck together and have them fold them (it doesn’t really matter how)
- Clip one clothes peg to one end of the folded coffee filters. Students dip them into bowls of food coloring (prevents colored fingers!)
- Unclip the drippy coffee filters and drop on a piece of wax paper to dry (have names on the wax paper)
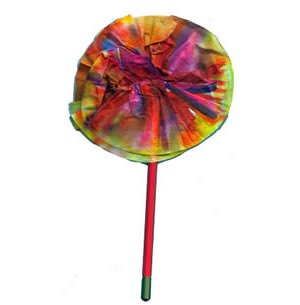
- When dry, scrunch the colored filters around the pencil and tape to make a cheerful Mother’s Day flower
- After the coffee filters are taped, fluff them out a bit
Mother’s Day Gifts – My love grows and grows card
This is a fun card that can be changed in many ways. The children love the way it unfolds to make a longer and longer flower stem.
One of my students cut the middle section of the stem and added a longer strip of paper to make his stem really, really long. Some of the children like to glue petals onto the card. Others like to decorate the pot with stickers or bits of colored papers.
Materials:
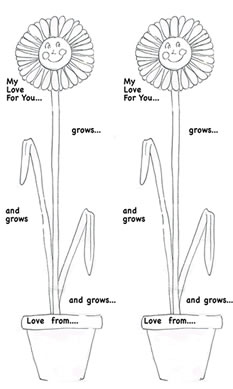
- Draw two flower pots and tall flowers on a piece of legal size paper
- Print the words beside the drawing as in image
- Photocopy
- Cut in half lengthwise and give one flower pot to each student.
- Cut pink 9 x 12″ construction paper in half lengthwise, then into three 4″ sections
- Markers and or crayons
- Small photos of the children to go in the center of the flower (optional)
Procedure:
- Have students color the flowers and print their names on the pots.
- Optional: the students glue a photo of themselves to the center of the flower
- Accordion fold the cards into 4 sections
- Glue a square of colored construction paper to the top and bottom folds of the card.
- When mom opens the card, the accordion fold paper grows longer and longer
