What is step-by-step drawing and why do we teach it ?
Also known as directed or guided drawing, it is a process where children (and adults) are provided with step-by-step instructions to help them draw a picture of a specific thing.
Many children arrive at school in September and draw with great confidence but there are always some who say they don’t know how to draw and are reluctant to try.
Some kids are upset when they compare their results with their peers. As a result, I recommend teaching two kinds of drawing to children – drawing by observation and step-by-step drawing.
Teaching children to draw by a step-by-step drawing process has a number of purposes:
- to increase children’s confidence
- to teach children to follow directions
- to increase directional and spatial vocabulary
- to introduce vocabulary about a new topic
- to have fun drawing
Don’t get me wrong. I am a keen advocate of teaching children to observe closely what’s in front of them, such as a feather or a shell and then attempt to recreate it with lines, shapes, textures and colors. Learning to draw by observation is a valuable skill for kids and is explained briefly in the “Recording your observations” section of the science center page.
But for kids who need an immediate confidence boost, I use the process of step-by-step drawing which is explained below.
Teaching step-by-step drawing
Materials:
- Whiteboard or large paper clipped to the wall that all kids can see
- Large newsprint paper for each child
- A large felt marker for each child
Step One: Teach one shape
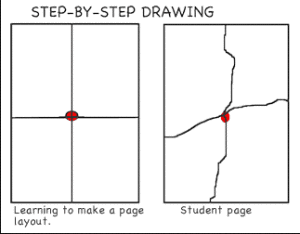
- To begin with, I put a dot in the center of my and each child’s paper with a red felt.
- The dot helps the children understand the term the “middle of the page” or the “center of the page”.
- Explain to the kids that you are going to make some marks on your paper and that when you’re finished, you want them to copy them on their papers.
- Don’t assume that your students have a well-developed directional and spatial vocabulary.
- Keep the students who lack confidence close to the front so you can quickly show them where to put their felts or guide their hands.
- For each step-by-step drawing lesson give the children scrap newsprint paper and tell them that this paper is for practice and they can throw it in the recycling after if they want to.
- Give the children one felt marker only, a brown, blue, green, or purple so that it shows up on their paper.
- Using felts keeps the children from constantly trying to erase.
At the end of the drawing steps, let those who want to color their pictures, use crayons, as the lines of the felt markers will not get covered up by crayons.
Start with tornadoes!
- On one side of the paper teach the children how to of make a circle.
- First let them put their arm in the air and go around and around and around.
- Then have them make a tornado on their paper by going around and around and around.
- Ask them to go around big, then smaller, then tiny.
- Model this on your paper before each size.
Step 2: Make page divisions
- Ask the children to turn their paper over.
- Although I can make the page divisions more neatly myself, I get the children to make them as it teaches them to organize their pages.
- Say slowly as you show them….
“Put your felt at the top of your page above the red dot and draw a line right through the red dot in the middle of the page and all the way to the bottom.”
Walk around and help all children do this. When all have completed the first step…
“Draw a line from one side of your paper through the red dot all the way to the other side. Now you have 4 boxes to draw in (Show them, don’t assume the children will perceive boxes and not a cross in the middle of their page). We will draw a step by step picture in each box.”

